How to Fix Yellow, Blue and Mixed Self-Tape Lighting
Fix yellow, blue, and mixed self-tape lighting by matching color temperature, using window light correctly, and locking camera settings.
By Sal Framondi
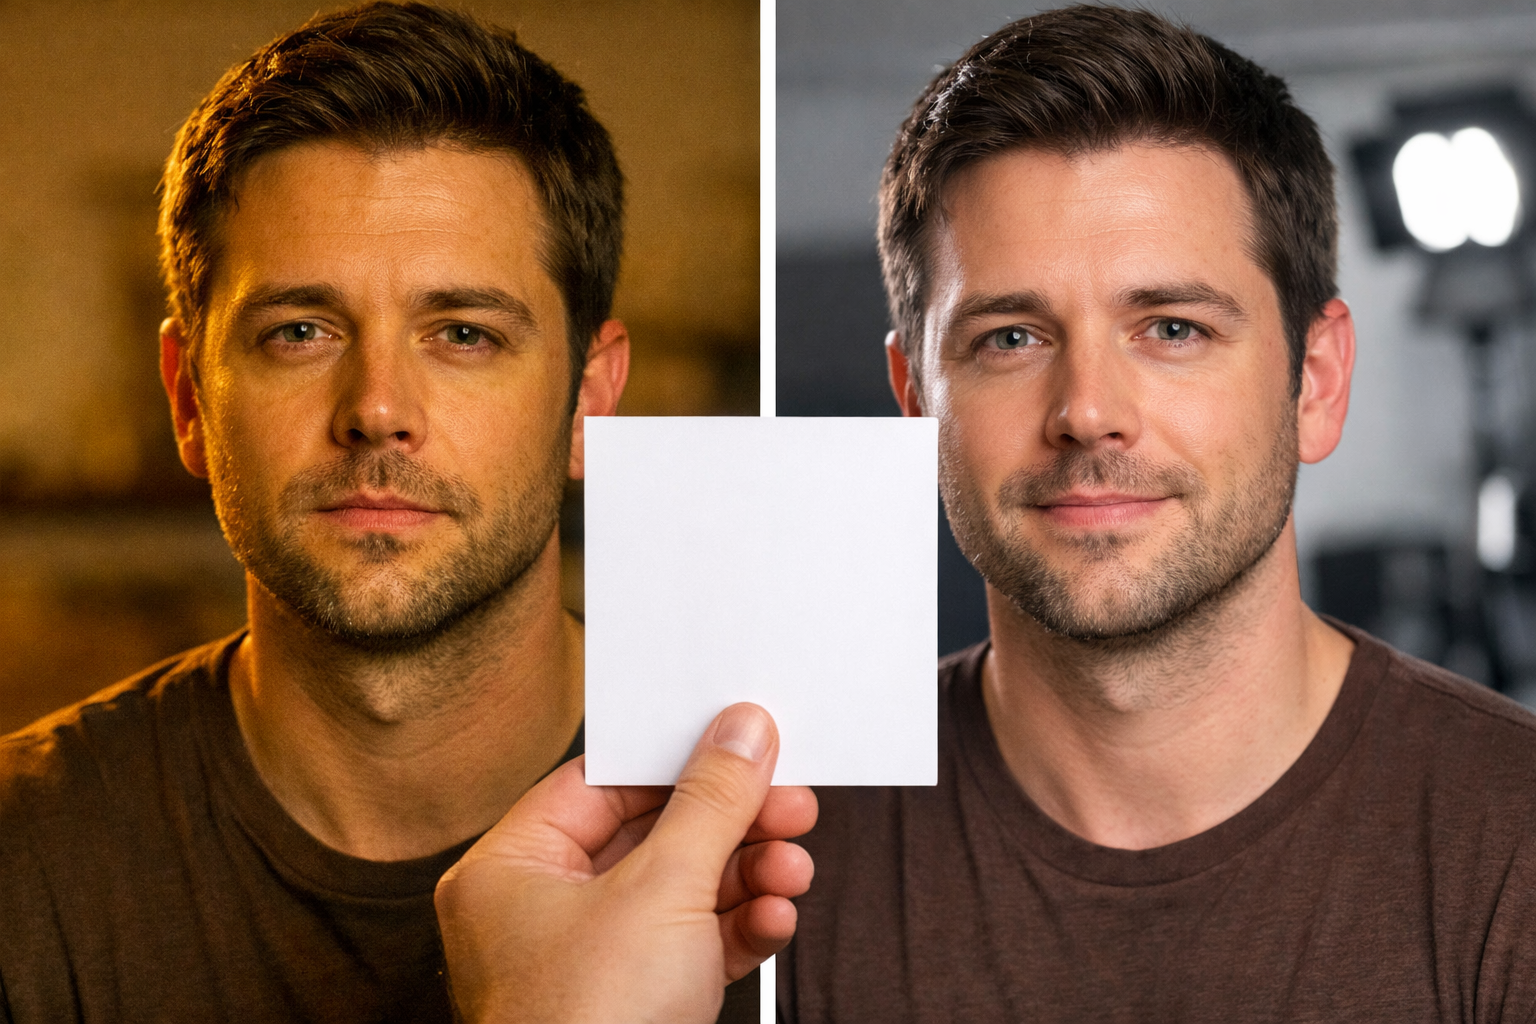
Natural-looking skin tones depend on one basic choice: the light sources hitting your face must agree. A yellow or orange cast usually comes from warm indoor bulbs. A blue cast or a two-tone face often appears when cool daylight and warm artificial light reach you at the same time.
You do not need an expensive lighting kit to correct either problem. Start by identifying every source of light in the room, choose one consistent approach, and then stop the camera from changing its mind during the take.
Why skin tones turn yellow or blue
Light sources have different color temperatures. Many warm household bulbs are near 3200K, while daylight is often near 5600K. A camera can usually correct one dominant source, but it may struggle when warm and cool light hit opposite sides of your face.
Check the image on the device that is recording. If your whole face looks yellow or orange, the room is probably too warm for the camera's current white balance. If one side looks warm and the other looks blue, you are mixing sources.
Fix a yellow or orange cast
First, turn off unnecessary warm lamps and ceiling lights. If your LED has a color-temperature control, move it toward daylight until your skin and a white object look neutral. Avoid adding more lights with different color temperatures, because that gives the camera another problem to solve.
You can use a clean white sheet of paper as a reference. Hold it near your face while standing on your mark and let the camera adjust. When the paper appears white and your skin looks natural, lock the focus and exposure if your camera app allows it. On many phones, pressing and holding on the screen engages AE/AF Lock.
Fix a blue cast or mixed light
If window light is making one side of your face blue while a lamp makes the other side orange, choose one of two fixes:
- Use artificial light only. Block the window with curtains or a heavy blanket, turn off other mismatched bulbs, and light the scene with one consistent setup.
- Match the window. If your LED is adjustable, set it near the daylight end of its range, around 5600K, and compare both sides of your face before recording.
Do not try to correct a split face by changing the camera angle alone. The color difference comes from the sources, so fix or remove the source that does not match.
Use window light for natural skin tones
A window can provide soft, even light without extra equipment. Face toward the window and place the camera between you and the glass, slightly off to one side if needed. Do not put the window behind you, where it can turn you into a silhouette. Avoid placing it directly at your side if that creates a hard bright side and a dark side.
Direct sunlight can create harsh shadows and make you squint. A north-facing window or an overcast sky may stay more consistent during a session. If the light is too hard, a sheer white curtain or thin white sheet can diffuse it. Keep the material away from heat sources and make sure it is secured safely.
The complete self-tape lighting setup guide covers placement and equipment choices in more detail.
Lock the image before the take
Automatic settings may shift the color or brightness when you move, lift an arm, or bring a bright object into frame. Once the lighting looks right, lock white balance where your camera allows it. On a phone, the available control may be combined with focus and exposure lock.
Record a short test while moving through the range you will use in the scene. Watch it back on the recording device. If the skin tone changes during the test, remove mixed light and check that the lock stayed engaged.
Choose a reliable backup
Window light changes with weather and time of day, so it may not work for an evening deadline or a long recording session. Keep one adjustable LED or another consistent artificial source available as a backup. The important part is not the price of the light; it is using a source you can repeat and match.
Quick skin-tone checklist
- Turn off lights you do not need.
- Do not mix warm room light with cool daylight unless you can match them.
- Face the window instead of placing it behind you.
- Diffuse harsh window light with a safe sheer material.
- Use a white object to check whether the color looks neutral.
- Lock white balance, focus, and exposure where possible.
- Record and review a movement test before the full take.
When the light is consistent and the camera settings stay fixed, your skin tone remains natural and the performance stays at the center of the frame.