Blog
6 months ago3-Point Lighting for Self-Tapes
Lighting is the silent language of professionalism. In 2026, casting directors expect "Set-Ready" visuals. Master the 3-point lighting blueprint to ensure your eyes, expressions, and emotions are the only thing the industry notices.
By Admin

The Professional Divide: Why Lighting is Your Most Critical Tech Choice
In the high-definition casting environment of 2026, lighting is the primary differentiator between an amateur submission and a professional booking. You can possess elite-level training and a high-end 8K camera, but without proper illumination, your performance will inevitably fall flat. Professional lighting is less about "looking cinematic" and more about ensuring your eyes and micro-expressions are unmistakably visible and consistent. Most self-tape failures stem from predictable errors: overhead lighting that creates "raccoon eyes," blown-out highlights that erase facial features, or mixed color temperatures that skew skin tones. Mastering the 3-Point Lighting system allows you to create a repeatable, "set-ready" environment that works in any room, at any hour.
Step 1: Establishing the Controlled Environment
Before introducing light, you must treat your self-tape corner as a controlled mini-studio. Position yourself several feet away from your background to prevent harsh shadows from "clipping" against the wall; this distance allows the light to "wrap" naturally around your features. Ensure your camera is locked at eye level and utilize an AE/AF Lock to prevent the exposure from "dancing" during your performance. The most critical rule of 2026 lighting is consistency: avoid mixing natural window light with artificial bulbs, as this creates "color pollution" that is difficult to fix in post-production.
Step 2: The Key Light—Your Main Source of Truth
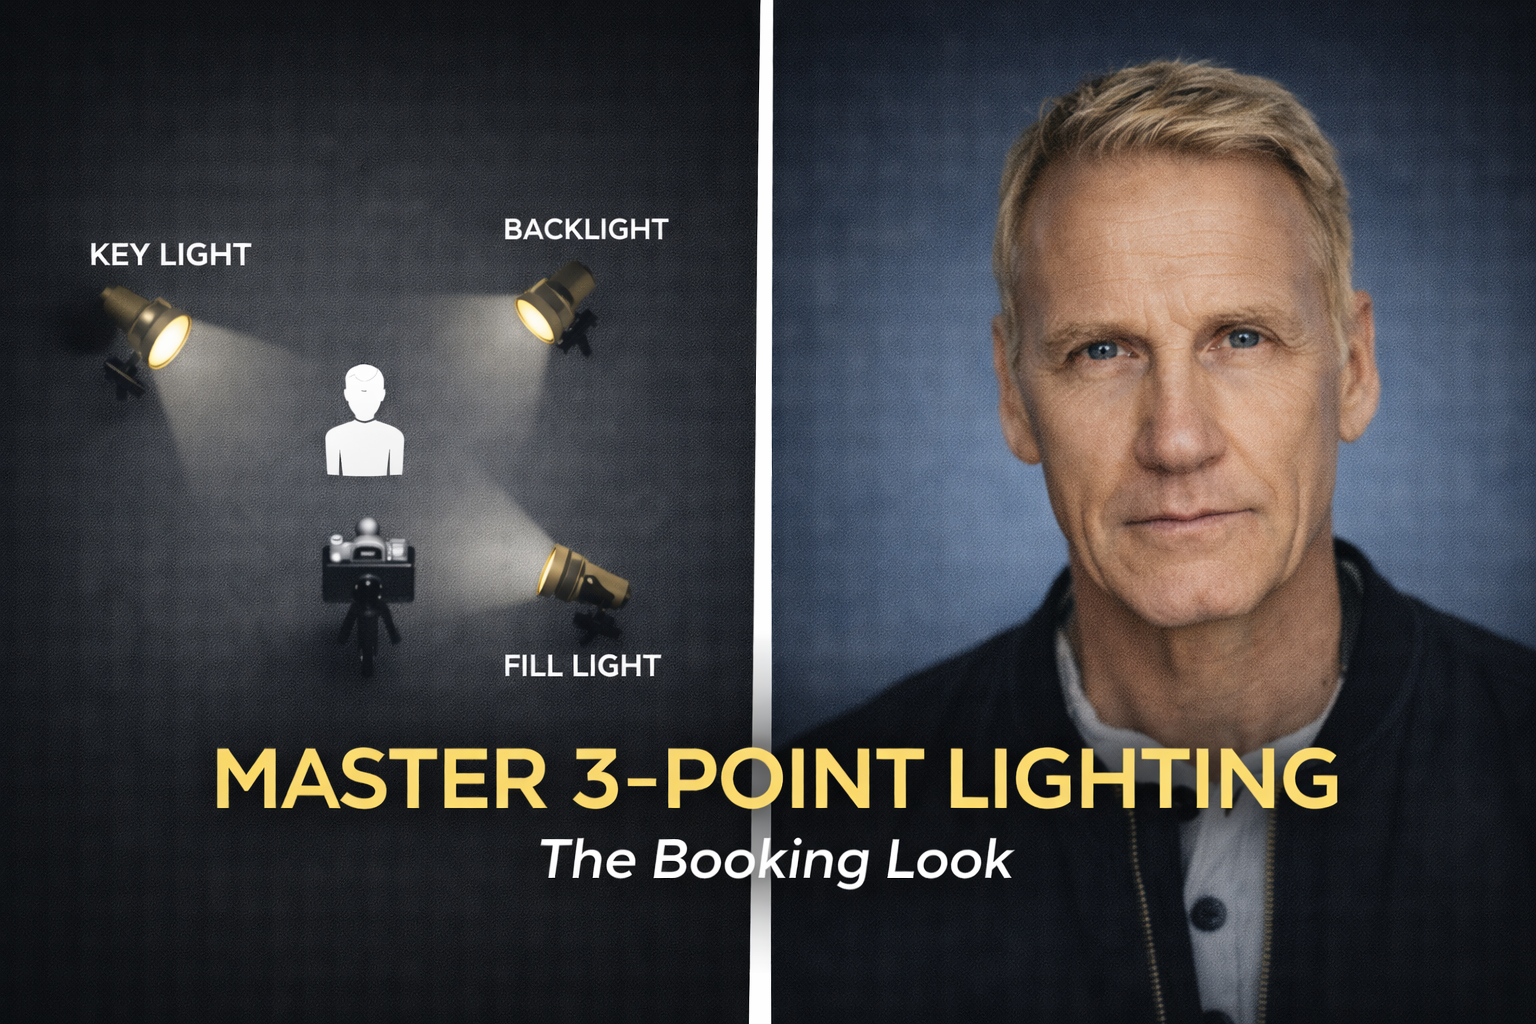
The Key Light is the primary source of illumination and should do the "heavy lifting" of your setup. Position the Key approximately 30 to 45 degrees off the camera axis (either left or right) and slightly above your head height, angled downward. For the most flattering results, use a large, diffused source like a Softbox. Large light sources create soft transitions between highlights and shadows, smoothing skin texture and providing a professional "glow." If you are using a bare LED panel, ensure you use a high-CRI (Color Rendering Index) diffuser to avoid harsh, secondary shadows that can distract from your performance.
Step 3: The Fill Light—Controlling the Mood
The Fill Light serves to soften the shadows created by the Key Light, providing detail to the "dark side" of your face. Place the Fill on the opposite side of the camera, also at a 30 to 45-degree angle. Crucially, the Fill should be set to a lower intensity than the Key—typically a 2:1 or 3:1 ratio. This creates a subtle sense of three-dimensional depth (modeling) without making the image look "flat." If your lights do not have dimmers, you can achieve this effect by simply moving the Fill Light farther back from your "acting mark."
Step 4: The Backlight (Hair Light)—Creating Separation
Often overlooked by actors, the Backlight (also known as a Rim or Hair Light) is the "secret sauce" of a professional frame. Position a small, subtle light behind you—opposite the Key Light—aimed at the back of your head and shoulders. This light should remain "invisible" to the camera lens, creating a gentle rim of light that separates you from the backdrop. This separation ensures you don't "blend" into the background, giving the image a polished, high-budget feel that mimics the look of a professional streaming series.
Step 5: Final Calibration and the "Eye-Light" Check
Once your 3-point setup is placed, perform a 5-second test recording. Check for three technical "deal-breakers": First, ensure you have Catchlights (small reflections of light in your pupils) to bring life to your eyes. Second, check for "blown-out" highlights on your forehead or cheeks; if these appear, increase your diffusion or move the lights back. Finally, verify your White Balance. If your skin looks unnaturally blue or orange, your bulbs are mismatched or your camera is miscalculating the color temperature. By mastering this repeatable checklist, you ensure that your acting remains the singular focus of every submission.
In the high-definition casting environment of 2026, lighting is the primary differentiator between an amateur submission and a professional booking. You can possess elite-level training and a high-end 8K camera, but without proper illumination, your performance will inevitably fall flat. Professional lighting is less about "looking cinematic" and more about ensuring your eyes and micro-expressions are unmistakably visible and consistent. Most self-tape failures stem from predictable errors: overhead lighting that creates "raccoon eyes," blown-out highlights that erase facial features, or mixed color temperatures that skew skin tones. Mastering the 3-Point Lighting system allows you to create a repeatable, "set-ready" environment that works in any room, at any hour.
Step 1: Establishing the Controlled Environment
Before introducing light, you must treat your self-tape corner as a controlled mini-studio. Position yourself several feet away from your background to prevent harsh shadows from "clipping" against the wall; this distance allows the light to "wrap" naturally around your features. Ensure your camera is locked at eye level and utilize an AE/AF Lock to prevent the exposure from "dancing" during your performance. The most critical rule of 2026 lighting is consistency: avoid mixing natural window light with artificial bulbs, as this creates "color pollution" that is difficult to fix in post-production.
Step 2: The Key Light—Your Main Source of Truth
The Key Light is the primary source of illumination and should do the "heavy lifting" of your setup. Position the Key approximately 30 to 45 degrees off the camera axis (either left or right) and slightly above your head height, angled downward. For the most flattering results, use a large, diffused source like a Softbox. Large light sources create soft transitions between highlights and shadows, smoothing skin texture and providing a professional "glow." If you are using a bare LED panel, ensure you use a high-CRI (Color Rendering Index) diffuser to avoid harsh, secondary shadows that can distract from your performance.
Step 3: The Fill Light—Controlling the Mood
The Fill Light serves to soften the shadows created by the Key Light, providing detail to the "dark side" of your face. Place the Fill on the opposite side of the camera, also at a 30 to 45-degree angle. Crucially, the Fill should be set to a lower intensity than the Key—typically a 2:1 or 3:1 ratio. This creates a subtle sense of three-dimensional depth (modeling) without making the image look "flat." If your lights do not have dimmers, you can achieve this effect by simply moving the Fill Light farther back from your "acting mark."
Step 4: The Backlight (Hair Light)—Creating Separation
Often overlooked by actors, the Backlight (also known as a Rim or Hair Light) is the "secret sauce" of a professional frame. Position a small, subtle light behind you—opposite the Key Light—aimed at the back of your head and shoulders. This light should remain "invisible" to the camera lens, creating a gentle rim of light that separates you from the backdrop. This separation ensures you don't "blend" into the background, giving the image a polished, high-budget feel that mimics the look of a professional streaming series.
Step 5: Final Calibration and the "Eye-Light" Check
Once your 3-point setup is placed, perform a 5-second test recording. Check for three technical "deal-breakers": First, ensure you have Catchlights (small reflections of light in your pupils) to bring life to your eyes. Second, check for "blown-out" highlights on your forehead or cheeks; if these appear, increase your diffusion or move the lights back. Finally, verify your White Balance. If your skin looks unnaturally blue or orange, your bulbs are mismatched or your camera is miscalculating the color temperature. By mastering this repeatable checklist, you ensure that your acting remains the singular focus of every submission.